
Snake Braid Tutorial – Hur man skapar en Snake Braid

Den zigzagging snake flätan är en av de gorgeously invecklade frisyrer som ser ut som att det tog ett helt skönhetslag att utföra när det är egentligen bara en femstegs slags “gör”. Några ormar flätar S-formar hela vägen längs hårets längd, men om du är pressad för tid, bokmärke den här praktiska guiden för hur du gör en subtilt sofistikerad sidversion.
Steg 1.

Börja fläta hur du skulle med någon annan stil, dra en hårsektion från sidan av ditt huvud och väva tre strängar tillsammans.
Steg 2.

När du är nästan hela vägen längs hårsektionen (ungefär tre fjärdedelar av vägen ner), separera de tre strängarna.
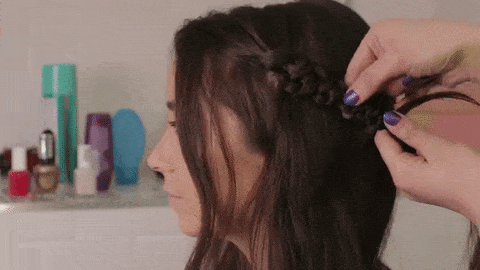
Steg 3.

Håll fast i mittensträngen med ena handen, tryck längden på håret hela vägen upp till toppen av flätan tills ditt hår är hårt spolat med dina rötter.
Steg 4.

Här får du justera fläkten för täthet. Lite drag i de enskilda sektionerna av flätan tills de S-formade spolarna är mer utspridda. Ju mer du förlänger flätan, desto mer synlig kommer ormen “orm” att visas.
Steg 5.

Säkra flätan med en bobby-stift och svep det omgivande håret över det för att täcka stiftet.
voilen.

Din sida snake fläta är redo att gå!
Följ med hela videon från början till slut (att du kan pausa och spola tillbaka så mycket som du behöver).
GIFs av Katja Cho.
Följ Marie Claire på Instagram för de senaste celebsnyheterna, vackra bilder, roliga saker och en insider POV.
As an AI language model, I do not have a native language, but I can provide a translation of the text into English:
The zigzagging snake braid is one of the gorgeously intricate hairstyles that looks like it took a whole beauty team to accomplish when its really just a five-step kind of “do”. Some snakes braid S-shapes all the way along the length of the hair, but if youre pressed for time, bookmark this handy guide on how to do a subtly sophisticated side version. Step 1. Start braiding as you would with any other style, pulling a hair section from the side of your head and weaving three strands together. Step 2. When youre almost all the way down the hair section (about three-quarters of the way down), separate the three strands. Step 3. Hold onto the middle strand with one hand, push the length of the hair all the way up to the top of the braid until your hair is tightly coiled with your roots. Step 4. Here you get to adjust the braid for tightness. Pull on the individual sections of the braid a little until the S-shaped coils are more spread out. The more you lengthen the braid, the more visible the snake “snake” will appear. Step 5. Secure the braid with a bobby pin and sweep the surrounding hair over it to cover the pin. Voila. Your side snake braid is ready to go! Follow the entire video from start to finish (that you can pause and rewind as much as you need). GIFs by Katja Cho. Follow Marie Claire on Instagram for the latest celeb news, beautiful photos, fun stuff, and an insider POV.